The Pluto Plus Software Defined Radio is a a popular alternative to the original Adalm Pluto Active Learning Module from ADI and is often used in amateur radio applications, especially for QO-100 satellite stations.
Pluto Plus has some advances regarding the ADI’s Adalm Pluto, but unfortunately it seems to be quite sensitive to firmware updates. After the first attempt at an update, mine stopped responding, only the green LED lit up and there was no longer any reaction on the USB either. The DFU function, which is intended for a such a case, could no be started. I noticed that a lot of OM’s seem to have the same problems, so I decided to describe my way back to a working Pluto Plus here.
After endless research on the internet and trying to revive the Pluto via the JTAG port, I got the Pluto running with different firmware versions, but there was always any error message and after a restart it was dead again. Even the Firmware on Github Repo was not working. Maybe Pluto got a new hardware version in the meantime, I dont know. Only with version 0.34-dirty I was able to permanently revive the Pluto.
The information collected here came from various sources on the internet, each one brought me a little further. I would like to thank everyone who shared their experiences and know-how in this way.
Laszlo, M0BOY, has found a way to boot a dead Pluto+ from the SD card and thus revive it. I recommend to trying this version first because no special software or a JTAG programmer is required.
What you need:
- XILINX Platform Cable USB II Model DLC10 (or a compatible adaptor)
- USB/UART adaptor 3,3V
- Vivado™ Lab Solutions Software
- Putty Terminal Software
- Windows PC
Vivado™ Lab Edition is a compact, and standalone product targeted for use in the lab environments. It provides for programming and logic/serial IO debug of all Vivado supported devices. Lab Edition requires no certificate or activation license key. Vivado Hardware Server enables Vivado™ Design tools to communicate with a remote target system.
https://www.xilinx.com/support/download.html (scroll down to Vivado Lab Solutions)
Preparation:
- Install Vivado™ Lab Solutions
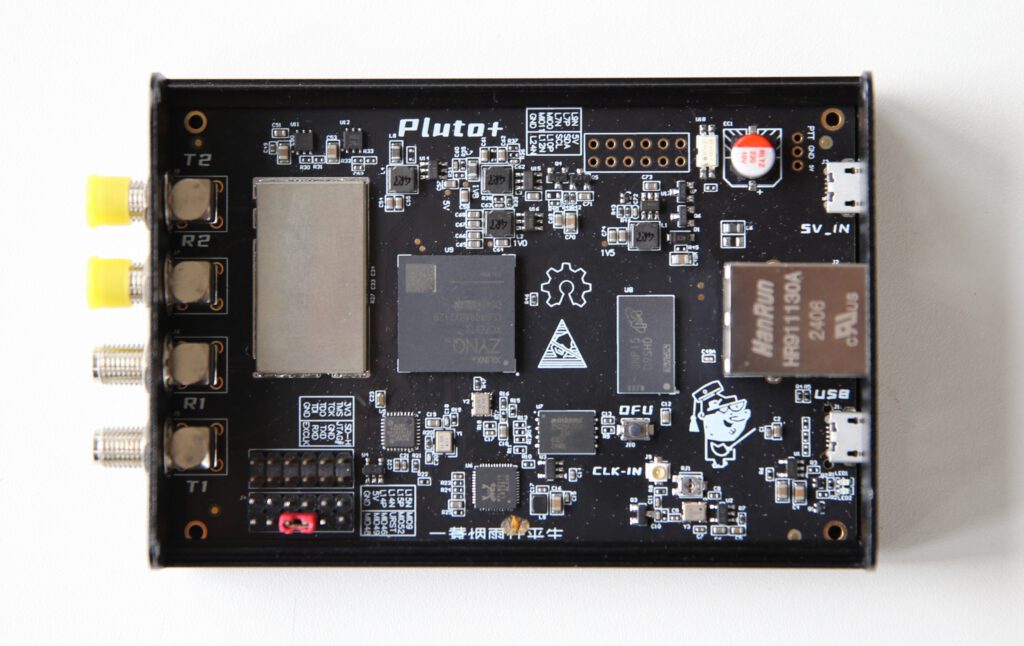
- The pin headers for JTAG and the serial console must be soldered into the Pluto
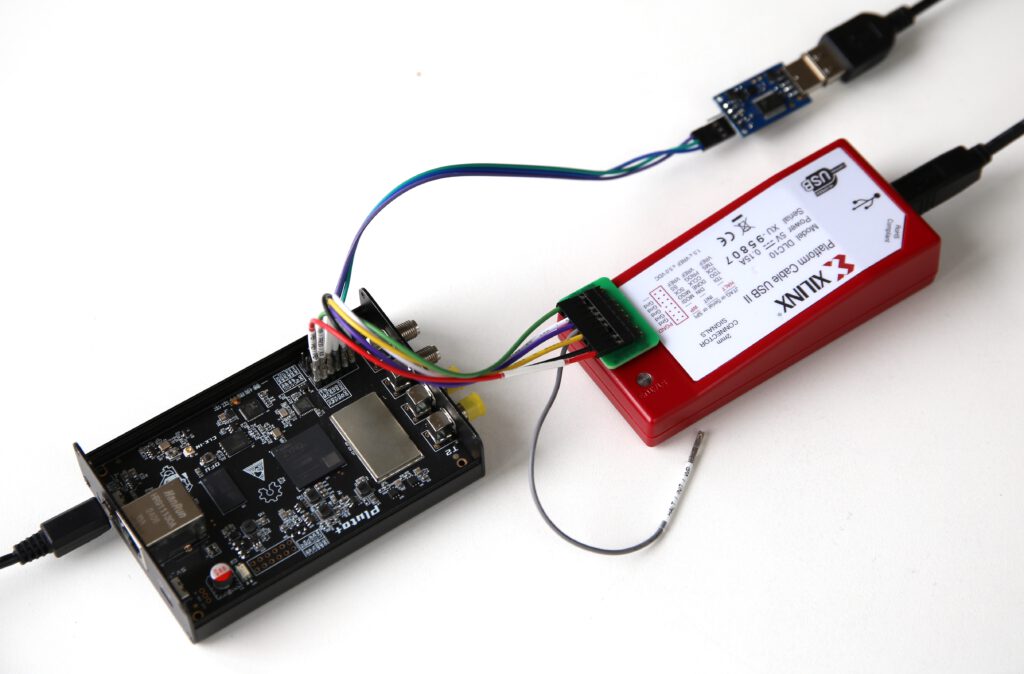
- Connect XILINX Platform Cable USB II with Pluto (3V3 – TMS – TCK – TDO – TDI – GND)
- Connect JTAG# pin to GND
- Connect USB/UART Adapter 3,3V with Pluto (GND – TXD – RXD)
- Connect Pluto by USB-DATA to the PC
There are instructions that describe that you should set the jumper for DFU according to URST-MI052. I guess this is correct for normal DFU mode with a working unit. With this method, the jumper could remain on URST-MI046. Maybe that there are other hardware versions where this is different. So feel free to try the other jumper setting if you get errors.
How to Unbrick:
I packed all the files required to unbrick the Pluto to version 0.34-dirty in a ZIP file. Unpack this ZIP file and copy the contents into a folder on your PC, e.g. c:/pluto+.
- Now start Putty as a serial console for the USB/UART adaptor with the COM port of your adaptor and 115200 baud.
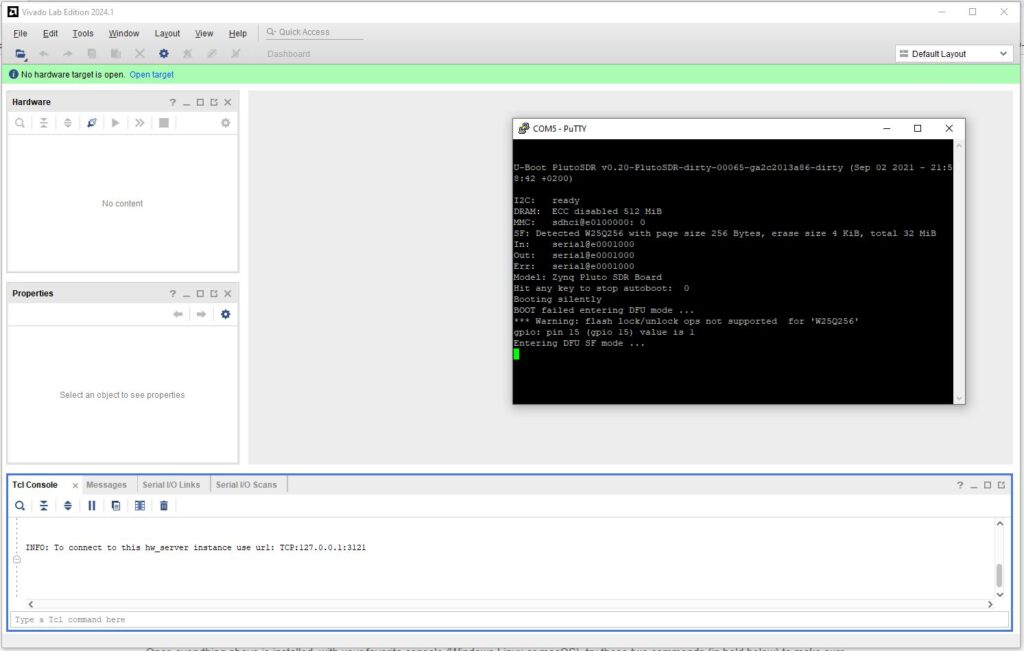
- Start Vivado™ and open the Hardware Manager.
- In the TCL console, change to the directory where the files from the ZIP file were stored, e.g. with “cd c:/pluto+”
- Press and hold the DFU Button
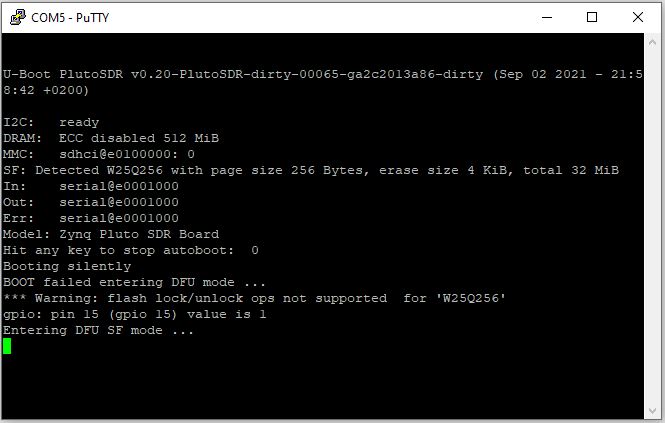
- Start the script in the TCL console with “exec xsdb run-xsdb.tc”. When the script runs, watch the serial console. Once the script has run, the Pluto should output text in the console and start the DFU mode.
If you get error messages here, perhaps set the jumper from URST-MI046 to URST-MI052. Start the script again with “exec xsdb run-xsdb.tc”. My Pluto didn’t always behave the same way here.
Now the Pluto should be in DFU mode and there should be an entry “USB download gadget” in the device manager of the PC.
Open a Windows console and go to our directory (e.g. cd c:/pluto+). Enter the following commands one after the other:
- dfu-util.exe -D boot.dfu -a boot.dfu
- dfu-util.exe -D uboot-env.dfu -a uboot-env.dfu
- dfu-util.exe -D pluto.dfu -a firmware.dfu
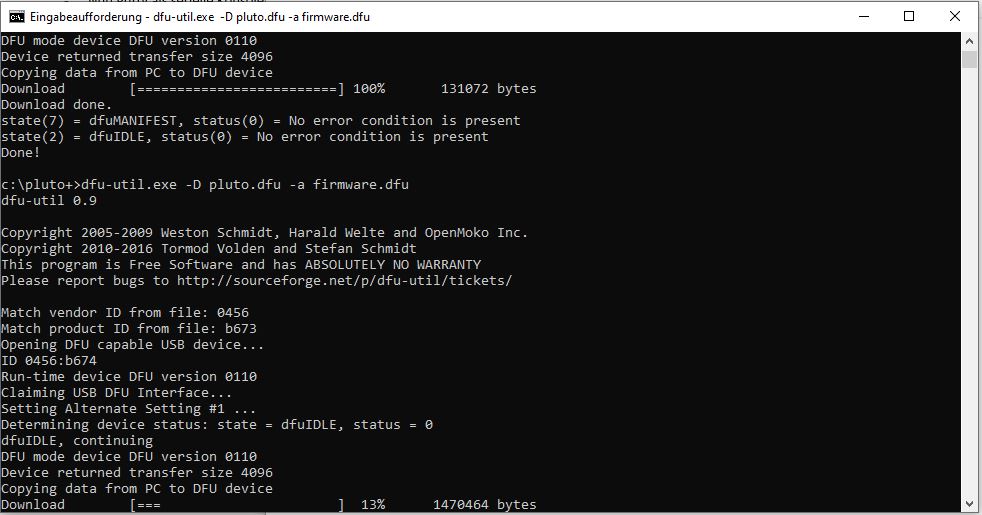
You can watch the progress in the serial console. At the end, press ctrl-C and enter “boot”. The Pluto should now reboot and work again. Try to restart it by disconnect the power.
For many applications this firmware is good as is and the network port works fine. If anyone has any suggestions or further information, please write in the comments below or leave an email.
73′ de DL4GLE
Gerhard Härtel
Sehr guter Artikel. Ich habe mit ähnlichen Problemen zu kämpfen. Mein Pluto+ hat sich beim Rückbooten auf eine 0.3x Firmwareversion aufgehängt (grüne LED blinkt dauerhaft schnell). Versuche nun mit micro sd card im DFU Modus zu booten. Bin noch am Überlegen, welche Dateien als Image auf die sd card dazu geschrieben werden müssen. Für Rückmeldungen stehe ich gerne zur Verfügung.
73 Gerhard
DB4AS
admin
Hallo Gerhard, vielen Dank für den Kommentar. Blinken der grünen LED hatte ich noch nicht, aber das würde zumindest darauf hindeuten, dass die Software noch was macht. Hast du schon mal DFU über USB probiert? Es gibt wohl mindestens 2 Versionen vom Pluto Plus, eine ältere mit 1.8V am JTAG und die aktuelle mit 3.3V. Vielleicht benötigen diese Versionen auch unterschiedliche Software, das könnte der Grund sein warum die meiste Firmware die ich im Netz gefunden habe bei meinem relativ neuen Pluto (3.3V) nicht funktionieren. Ich arbeite auch mit dem originalen Adalm Pluto, da habe ich schon alle mögliche Firmware probiert und hatte nie solche Probleme. An meiner Station läuft eine Version mit DATV Unterstützung von F5OEO einwandfrei!
Lass mich wissen wenn ich helfen kann. 73′ Günter
Gerhard Härtel
Ich habe inzwischen über usb einen reboot durchgeführt, da ich nicht weiß, welche boot Dateien auf die sd card kopiert werden müssen. Allerdings muss ich bei jedem Start beim Einstecken des usb Steckers die DFU Taste drücken und dann noch 5V Dauerplus auf die andere Buchse legen. Wenn ich die trenne, muss das bei jedem Neustart durchgeführt werden. Ethernetbuchse über LAN funktioniert auch nicht mehr. QO100 mit SDR Console v3.3 geht aber problemlos. Habe jetzt die Firmware v0.37-dirty mit datv-package installiert. Mein pluto+ ist übrigens die alte Version 1.8V.
DATV- Betrieb habe ich aber bisher weder mit dem pluto+ noch mit dem normalen Adalm Pluto und der F5OEO Firmware zum Laufen bekommen.
Ich verwende datv easy 3.3 und und OBS Studio. Beim Senden leuchten beide Anzeigen in DATV EASY 3.3 aber die Verbindung zu OBS Studio wird immer wieder getrennt und neu aufgebaut. Mein Datenstrom steht dabei immer auf null. Habe schon alle möglichen Einstellungen ausprobiert aber bisher noch nie ein DATV Sendesignal im WB- Transponder generieren können.
Vielleicht kannst Du mir ja einen Tipp geben?
73, Gerhard
DB4AS
admin
Die Version V0.37-dirty kenne ich, die habe ich auf dem normalem Adalm Pluto laufen, da funktioniert das super, auch mit OBS. Auf meinem neueren Pluto+ geht diese Version gar nicht. Auch die SD-Karte hab ich noch nicht zum laufen gebracht. Beim Streamen von OBS oder anderer DATV Software muss man aufpassen dass die Videobitrate unter der Bitrate des Transportstreams liegt, das sollten so ca. 70% sein. Da gibts im Internet ein paar Bitratenrechner mit denen man das gut aus der Symbolrate usw. ermitteln kann, z.B. hier https://www.satbroadcasts.com/DVB-S_Bitrate_and_Bandwidth_Calculator.html. Ich habe DATV über QO-100 erst mal hinten angestellt weil ich eh keine geeignete PA dazu habe, da reichen meine 20W am 120er Spiegel bei weitem nicht.
Marcus, DM6TT
Hi Günter,
I sucessfully debricked my Pluto+ with your explanation, thanks for that.
Things I trapped in:
– JTAG Pin must be connected to GND, otherwise I got an error in Vivado when resetting the device
– I had to press the DFU botton during processing
exec xsdb run-xsdb.tcl
Otherwise the DFU mode was not started and I ended up in the U-Boot prompt.
U-Boot PlutoSDR v0.20-PlutoSDR-dirty-00065-ga2c2013a86-dirty (Sep 02 2021 – 21:)
I2C: ready
DRAM: ECC disabled 512 MiB
MMC: sdhci@e0100000: 0
SF: Detected W25Q256 with page size 256 Bytes, erase size 4 KiB, total
32 MiB
In: serial@e0001000
Out: serial@e0001000
Err: serial@e0001000
Model: Zynq Pluto SDR Board
Hit any key to stop autoboot: 0
Unknown command ‚bootp‘ – try ‚help‘
Wrong Image Format for bootm command
ERROR: can’t get kernel image!
Pluto>
I installed Viavado on Linux, here are some things one has to take care of:
– After installing the Software, the DLC10 the uDEV rules must be installed:
cd /tools/Xilinx/Vivado_Lab/2024.1/data/xicom/cable_drivers/lin64/install_script/install_drivers
sudo ./install_drivers
– To use the dfu-util you have tell it the usb device-id
Identify the DFU-Mode device in dmesg:
kernel: [12152.556544] usb 1-1.2: new high-speed USB device number 41 using xhci_hcd
kernel: [12152.707019] usb 1-1.2: New USB device found, idVendor=0456, idProduct=b674, bcdDevice= 2.21
kernel: [12152.707031] usb 1-1.2: New USB device strings: Mfr=1, Product=2, SerialNumber=3
kernel: [12152.707035] usb 1-1.2: Product: USB download gadget
kernel: [12152.707038] usb 1-1.2: Manufacturer: Analog Devices Inc.
You have to use 0456:b673 instead of the shown 0456:b674!
sudo dfu-util -d 0456:b673 -D boot.dfu -a boot.dfu
sudo dfu-util -d 0456:b673 -D uboot-env.dfu -a uboot-env.dfu
sudo dfu-util -d 0456:b673 -D pluto.dfu -a firmware.dfu
If one wants to install the Pluto+ Firmware from F5OEO (https://github.com/F5OEO/plutosdr-fw)
install all three components out of the archive in DFU mode:
sudo dfu-util -d 0456:b673 -D boot.dfu -a boot.dfu
sudo dfu-util -d 0456:b673 -D uboot-env.dfu -a uboot-env.dfu
sudo dfu-util -d 0456:b673 -D plutoplus.dfu -a firmware.dfu
I bricked my Pluto+ with trying to use the pluto.frm in the package on Linux command line.
73, Marcus, DM6TT
admin
Hello Marcus, thank you very much for the feedback and additional information. I’m very happy that it worked now!
73, Günter, DL4GLE